Smart Cards and SSH Authentication
View Markdown Other ArticlesArticle written by a human: Mike Cardwell
There are many options for authentication when SSH'ing into a machine. The most common (and least secure) is simple password authentication. You can make this secure(ish) if you can guarantee that your users are going to use non-trivial unique phrases, from machines free of keyloggers; easier said than done. A better method is to require key based auth. If you do that, you need to guarantee that your users secure their keys and password protect them, again with non-trivial unique passphrases. I'm going to talk about a third option, which is to use smart cards.
Hardware
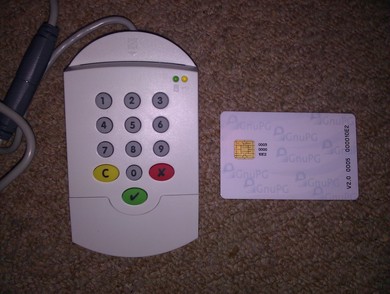
First of all, to whet your appetite. The hardware I use:
An OpenPGP Version 2 Smart Card, which I purchased for approximately £15 from Kernel Concepts. And an SCM SPR-532 USB Smart Card Reader, which I purchased for approximately £30 from PremOne Computers Ltd.
I plug the USB smart card reader into my Windows 7 desktop at work. My Ubuntu Thinkpad laptop has a built in smart card reader.
Generating the keys
The standard way of generating and using SSH keys is to use the ssh-keygen command from the OpenSSH package. This generates a keypair. You append the public part of the key to the ~/.ssh/authorized_keys file on the destination machine and keep the private part of the key, password protected, on the source machine. With smart cards it is different:
- Install the latest version of GnuPG 2
- Generate a keypair using "gpg --gen-key"
- Add an authentication subkey to your new keypair by using "gpg --edit-key" and the "addkey" command
- Use the "keytocard" command to transfer the private part of the newly created authentication key to the smart card
Once you've reached this point, the private part of your ssh/authentication key exists only on the smart card and can not be read by you or anyone else. A stub referencing the subkey is left behind with your on disk keypair. Whenever you try to use that subkey, the system will request that you insert the smart card.
Accessing the public key
Install the gnupg-agent package. One of the commands it comes with is called "gpgkey2ssh". Running this command with the key id of the authentication subkey will output a key which you can add to ~/.ssh/authorized_keys on any machine which you want to SSH into. Because my own key is on the public keyservers, you could technically give me ssh access to a machine by running the following simple commands:
gpg --recv-key 0018461F
gpgkey2ssh 13990B29 >> ~/.ssh/authorized_keys
Authenticating using the smart card
Now, how do we get the OpenSSH client to use the smart card for authentication? Typically, OpenSSH uses the ssh-agent application to handle authentication. gpg-agent has been designed to speak the same protocol as ssh-agent though (when enabled). If you stop the ssh-agent process, and add "enable-ssh-support" to ~/.gnupg/gpg-agent.conf then the OpenSSH client should start talking to gpg-agent instead. Once you've done this, if you run:
ssh-add -l
You should see that the key you generated previously is mentioned (only when the smart card is inserted).
And now you're done. If you ssh in to a machine which has your public key, you will not be prompted for your password. Instead, you will be asked to type in your pin on the smart card readers pin pad. The pin pad of my USB smart card reader makes a loud beep noise each time you press a button. This is not ideal in some scenarios so in these cases I use the keyboard instead. This is possible by adding "disable-keypad" to ~/.gnupg/scdaemon.conf.
Windows/Putty
If your client machine is running Windows and you're using Putty, there is a drop in replacement for "pageant" at https://smartcard-auth.de/ssh-en.html which does the same authentication task that gpg-agent provides in the Linux environment. Putty by default attempts to authenticate using "pageant" if it's available, so as long as you make sure it's running, and as long as your Windows gpg installation has a keypair with the subkey stub, it will just work. When putty prompts you to enter your pin, it gives you the option of using the hardware pin pad, or typing it in at the keyboard.
Other stuff
Once you have key based authentication set up, you might want to disable password authentication altogether. You can do this by setting "PasswordAuthentication" to "no" in /etc/ssh/sshd_config on the server side. You might still be wondering what the point of using smart cards over standard ssh key authentication is. There are a few advantages:
-
If a machine is compromised, the attacker could potentially hijack SSH connections whilst you're using them. If your keys are on a smart card, that's all they can do. If they're on disk (even if they're password protected), the attacker can steal them and use them at will from any machine at any time.
-
If you're giving somebody else SSH access to a machine with standard key authentication, they could strip the password from the key for convenience or use an insecure password to protect it. They could leak the key, eg by using unencrypted backups or copying it to an easily lost USB stick. If you give them a smart card with a pre-generated key, then they wont be able to leak their key in this manner.
-
Smart card pins can't be brute forced, so it's not a huge security problem if they are lost. Smart cards are designed to wipe themselves after a few failed pin attempts
Signing/Encryption
I didn't buy my smart card so I could use it with SSH. I purchased it mainly so I could use it for signing and encrypting email. The SSH capability is a bonus side effect. With the smart card reader plugged in to my work machine, it means I can safely sign my work email without exposing my secret keys or smart card pin to the work machine.